You can easily import all of your products at once without adding them one by one.
Minimum requirements for using “Bulk Create” feature:
– Microsoft Windows 10 or higher
– Microsoft Excel 2013 or higher
Step 1. Downloading and Preparing Excel File
- Login to your dashboard.
- Navigate to Products page under Products menu.
- Click on “Bulk Create” button on top right of Products page.
- Download sample Excel file by clicking on “Download Excel” button.
Note: You can skip menu selection input after clicking on Download Excel button, just click on Download Excel button on popup again. - Open downloaded Excel file, and enter product details to each line.

Product Name
Product name needs to be unique, there can be only one product with same name, and maximum lenght should be 50 characters long.
Note: If you have more than one languages defined, you need to enter product name in all languages.
Product Description
You can enter product description or details. Optional.
Note: If you have more than one languages defined, you need to enter product description in all languages.
Unit Selection
Just select “Unit” from dropdown unless you have an advanced Point of Sale or Stock integrations with RestApp.
Category
Enter category name of that product, if you already added categories from your dashboard under Categories page, you can type same category name here. If the typed category does not exists in your categories, system will create a new category with that name.
Sub Category
Use this only if you want some products listed under subcategory. This is optional.
An example:
Category: Wines
Sub Category: Red Wines
Sub Category: White Wines
Delivery Price & Delivery Tax
Enter price and tax rate for delivery orders.
Pickup Price & Pickup Tax
Enter price and tax rate for pickup orders. (If you offer different prices for pickup orders, please also check out this article: Setting Different Prices for Delivery and Pickup)
POS Price & POS Tax
You can enter same price with pickup price here, this price area is not important if you are not using RestApp EPOS or E-Menu products. This price will be displayed in POS or E-Menu if you are using any of those.
Calories
Only numbers. Optional.
Weight
Only numbers. Optional.
Product Barcode
Only if you are using an integration with your Point of Sale or Stock Management System. Optional. - Save excel file when you finished entering your products.
Step 2. Importing Excel File
- Return back to your Bulk Update page. (Page that you downloaded this excel file.)
- Click on “Select a file” button, and select the Excel file you recently filled and saved.
- Click on “Add” button after you selected the file, and wait while system processes your products.
You will see a yellow notification at top of the page that says “XX product successfully created.” when its finished.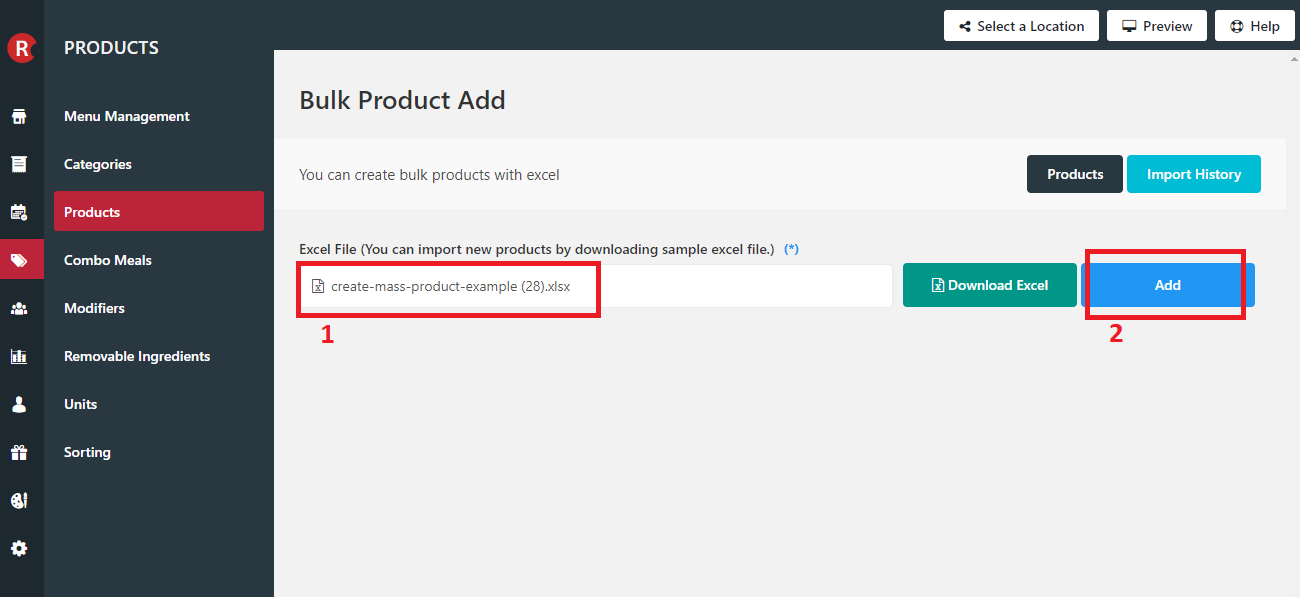
Troubleshooting
If you run into trouble while importing your products and some of your products are not created, follow these steps:
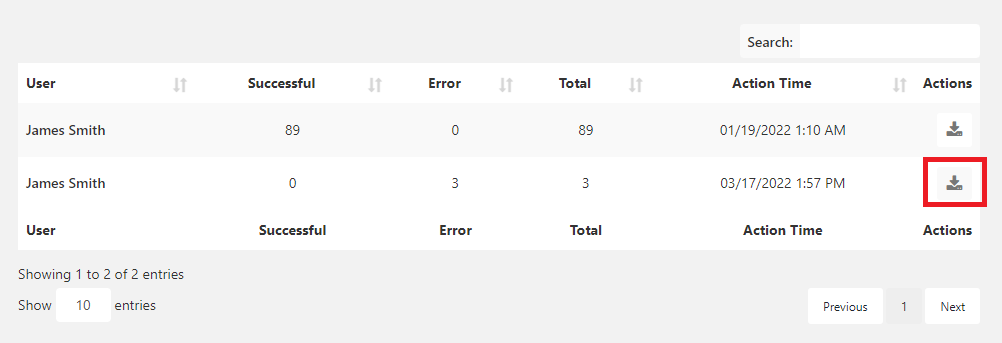
- Click on “Import History” button on top right
- You will see a list of your import history, find your latest import and click on download icon at right side of that line.
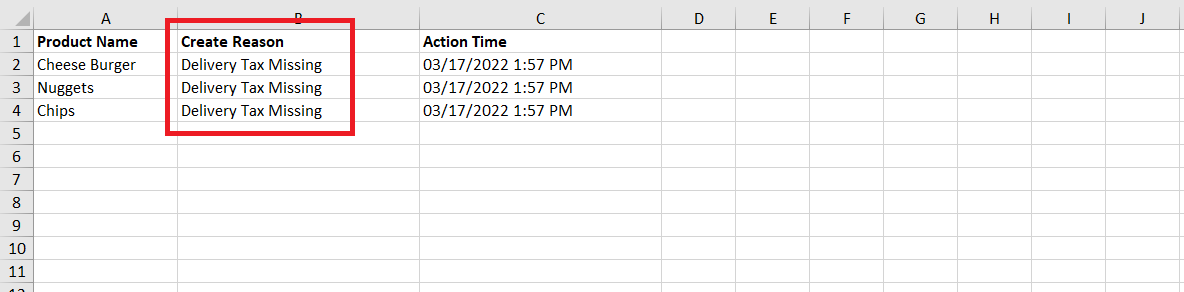
- Open excel file you just downloaded, and you will see the reason why your import process has failed.
- Open back your excel file that you recently uploaded, fix the stated issues and go back to “Bulk Create” page to upload that file again.
If you still facing issues while creating your products in bulk, you can open a support ticket.